Showing posts with label easy dinner. Show all posts

Sunday, August 15, 2010

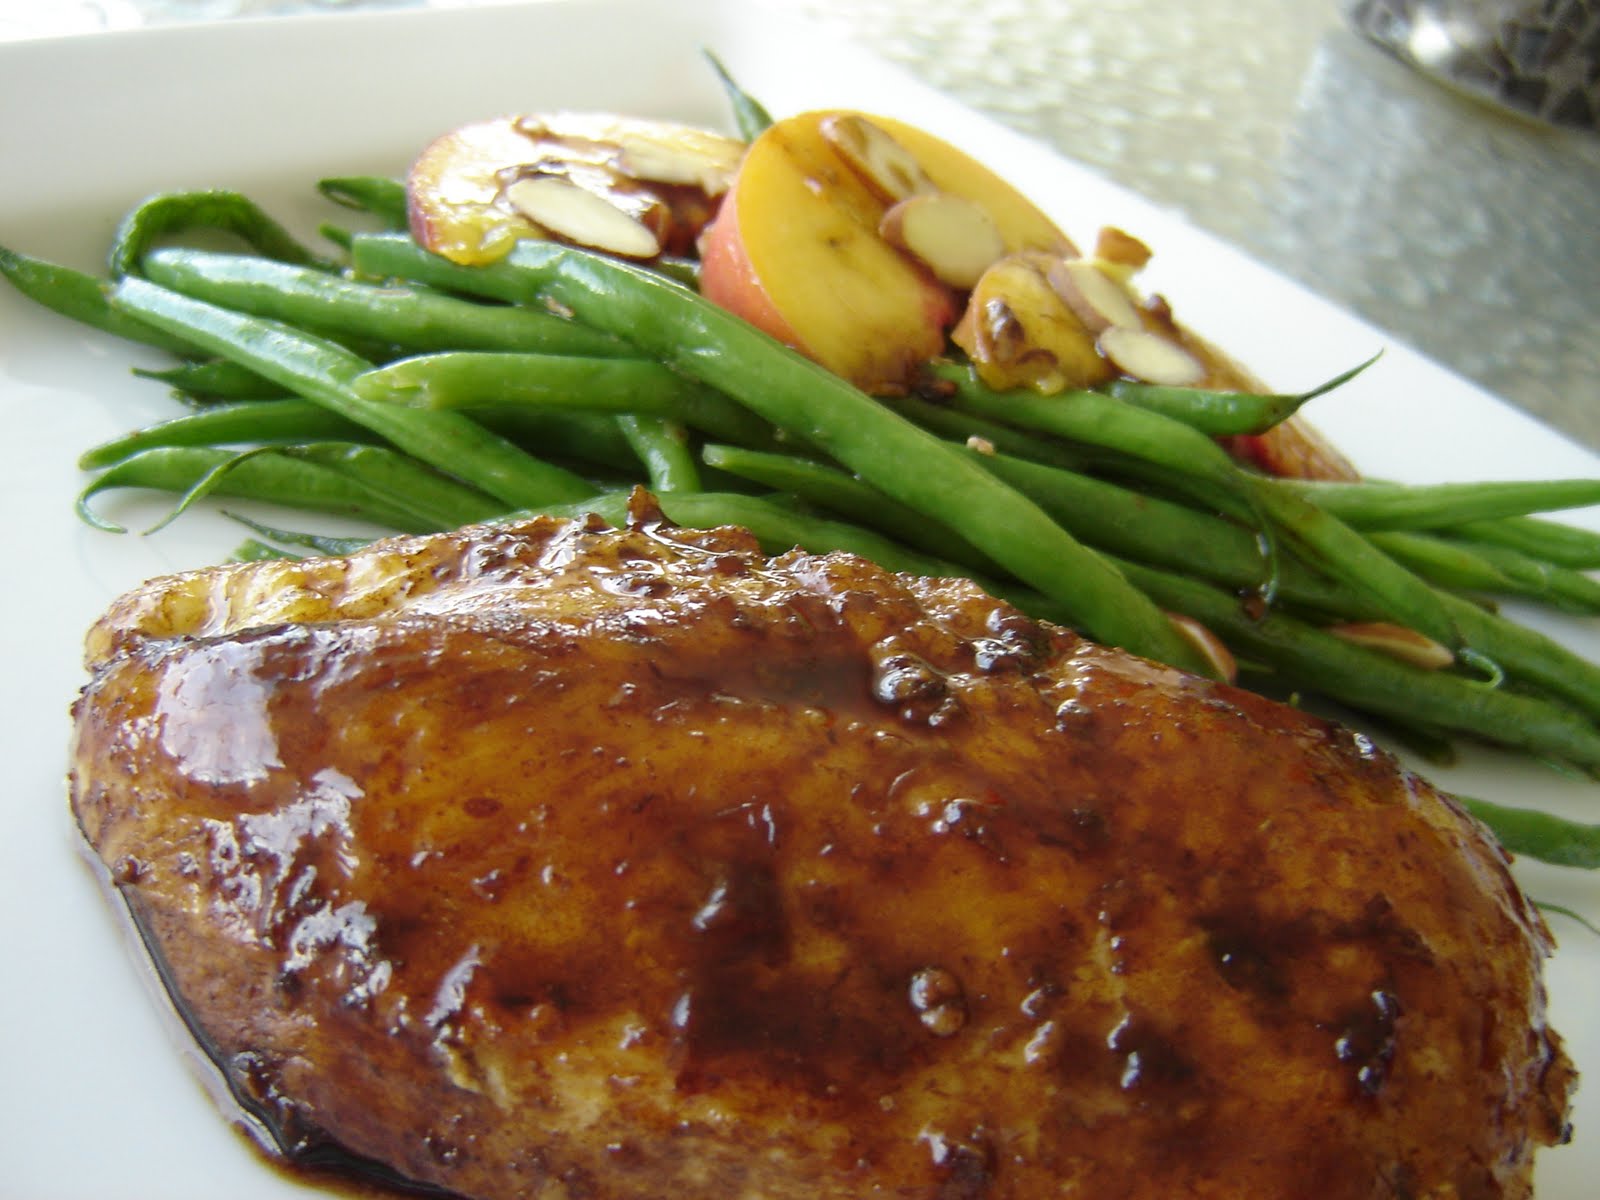
Balsamic Glazed Chicken

Yesterday just flew by for some reason.  It got off to an early start with some prep work for the lentil and brown rice pancakes I'll be making for tonight's dinner along with some roasted Veggies.  You know, rinsing lentils can be risky business at 7:30 am since one is not often conscious enought to realize that said lentils are small enough to pass through the holes in some colanders.  The relative inexpensiveness of lentils influenced my decision to just run some water and let them go down the drain as opposed to spending an hour and half picking them out of the sink one by one! 

My mother and I made an emergency run to Bath and Body Works to take advantage of the bag sale.  Our favorite farm stand is on that side of town as well so we stopped off there for some fresh, locally made goat cheese (I probably petted the very goat the milk came from) and some local produce.  From there it was off to BJ's wholesale club to restock some of the essentials.

It probably wouldn't have been such an ordeal if it had not been 115 degree freaking heat index.  Heat like that sucks the life right out of you.  We came home literally THREW ourselves in the pool for a couple of hour.  I always have a pitcher of fruit water in the fridge so I filled some glasses with ice and we drank them out by the pool...super refreshing.  There's no big secret to the fruit water...fresh cut fruit, sweetener or not (stevia in this case) depending on your taste, fresh mint and mineral water...sparkling or plain.  Just let the cut fruit and mint leaves sit in the water in your fridge for a couple of hours.  Waa laa...fruit water, natural and healthy (unlike some of those nasty artifically flavored fruit waters you see in the store).  If I'm going to use sparkling water, I just fill the glass about 1/3 of the way with the prepared fruit water and then top off with sparkling water so as not to water it down. 


Zero calories...plenty of satisfying flavor!  Plus, you get to eat the lovely chilled fruit when the glass is empty.


I seriously had no desire for cooking last night after all that so I didn't really plan on having anything to post.  However, I underestimated the beauty of the fresh produce.  This was about as simple a meal as you could prepare; pan cooked chicken breasts in a thick balsamic glaze with a side of haricots verts, slivered almonds and fresh peaches.

Just cook the boneless, skinless chicken breasts in some olive oil until they are mostly done.  Add 1/2 cup balsamic vinegar to the skillet and bring to a boil.  I also added a couple of tablespoons of honey but you don't have to.  Turn the chicken a few times as the vinegar reduces so that it becomes coated in the glaze.  It ends up being the most beautiful mahagony color and tastes sweet and tangy at the same time.

The beans didn't even require pre-cooking because they were so tiny.  I just sauteed them in olive oil with a little sea salt.  When they are crisp tender, add the slivered almonds and one large peach, sliced.  Toss gently until the peach slices are warmed.  When you plate everything, drizzle the chicken and beans with some of the balsamic glaze and enjoy!




BTW...We uploaded a brand spanking new video to our youtube channel today.
I apologize that it has taken me so long to start the next series of videos.  I haven't made any new ones in about three months.  My life SHOULD be settled back to my version of normal now so hopefully we can go back to adding a new one each week. 

I'll be adding a new page to the blog which will correspond with the weekly youtube video.  The recipes will be dated for the week that they post and then hopefully archived (once I figure out how) for future reference.  Just a note...even though I feature all kinds of foods on the blog, the recipes for my youtube channel are all vegan and vegetarian.  I strive to demo as many vegan recipes as possible because those are the ones viewers seem to want the most.  As you all know, my husband and mother are NOT vegans so I do cook meat (obviously) and those will continue to show up on the blog's main page.  I am working on them though.  Look for tomorrow's post about the incredible vegan dinner they are having!

Monday, July 19, 2010

Who are you calling a tart?

Part two of childless Sunday ended up being a lovely goat cheese tart with a sundried tomato and garlic polenta crust topped with paper thin slices of yellow summer squash and zucchini. 

It is a tremendously simple dish to make and serves well as a light meal (breakfast, lunch or dinner) or you may make in a square pan, cut into bite sized pieces and serve it as cocktail nibble.

To accompany the tart, we had a spinach salad which I dressed with a Yellow Tomato Vinaigrette.  Between the Herbs de Provence in the goat cheese and the dijon mustard in the dressing, the meal ended up having a decidedly French flair.

This is my lovely Tarte aux Fromage de Chevre et de deux Cougres Polenta or Goat Cheese and Polenta Tart with Two Squashes.  The salad is dressed with Jaune Tomate Vinaigrette Dijon or Yellow Tomato Dijon Vinaigrette.  I just SOUNDS so much fancier when you say it in French oui?

I also decided to set the small table by the kitchen window pour deux and have a leisurely dinner WITHOUT the television!  Now how to wrest the remote from Roger's clutches?  Someday he will be buried with that thing because it is unlikely that the mortician will be able to pry it from his cold dead fingers!

So here is our lovely intimate dinner for two...


Preparation of the tart begins simply with the making of the polenta crust.
You will need:
  • 2 cups boiling water or low sodium vegetable broth
  • 1 cup yellow corn polenta (buy organic if possible)
  • 1/2 teaspoon kosher salt
  • 2 cloves finely minced or pasted garlic
  • 1/2 cup oil packed sundried tomatoes, minced (do not drain)
Bring the water or broth to a boil over medium high heat; add the salt, garlic and minced sundried tomatoes with whatever oil is on them.  Gradually whisk in the polenta.  You must stir constantly and exercise caution for two reasons...lumps and splattering!  Hot polenta bubbles fiercely and can cause quite a serious burn if you are not careful. 

Once the polenta has thickened, remove from heat.  Lightly grease a removable bottom tart pan with room temperature butter.  Using a spatula, scrape polenta out into tart pan.  Grease the back of a spoon or your hands (if you have asbestos fingers like me) and press the polenta up the sides and evenly into the bottom of the pan creating a crust.  Set the crust aside to prepare the goat cheese filling.


  • 3 ounces soft, creamy style goat cheese at room temperature
  • 3 ounces whole milk ricotta cheese or cream cheese at room temperature
  • 2 ounces crumbled goat milk feta cheese
  • 1/2 teaspoon ground black pepper
  • 1 teaspoon (or to taste) Herbs de Provence
Using a spatula, mash the cheeses and herbs together thoroughly in a small bowl until you have a creamy homogenous mixture.  Spread the cheese evenly into the bottom of the prepared polenta crust.


Next you will prepare the two squashes.
  • 1 large (about 7 inches long) zucchini squash
  • 1 large or two small yellow crookneck summer squash
  • 1 clove grated garlic
  • 1 tablespoon olive oil
Using a mandolin slicer works best for getting the squash slices precisely thin but it you don't have one, simply slice them as thinly as you can.  Beginning at the outter edge, alternate slices of zucchini and yellow squash until a complete circuit of the tart is made.  Repeat in concentric circles to the center.  It usually takes 4 or 5 slices to finish the center of the tart.  Add the grated garlic to the olive oil and brush the whole surface of the tart liberally.


Preheat the oven to 425 degrees.  Bake the tart on the center rack in the preheated oven for approximately 30 minutes.  If the squash are not as nicely browned as you would like, switch the oven to broil and broil to desired browness.  I do not brown mine excessively...merely till the squash begins to curl at the edges.

The tart must rest for 10 minutes before attempting to remove the outer ring else you risk breaking the fragile polenta crust.  As it cools, the crust becomes more stable and the cheese filling more set.  This tart is actually best served at room temperature.


The Yellow Tomato Dijon Vinaigrette comes together in a flash with the blender
  • 2 medium yellow tomatoes, cored and cut into 8ths
  • 2 cloves pressed garlic
  • 2-3 tablespoons dijon mustard (to taste)
  • 1-2 tablespoons honey (to taste)
  • salt and pepper to taste
  • 1/3 cup white wine vinegar
  • 3-4 tablespoons extra virgin olive oil (more if you don't mind the fat)
Plop tomatoes, garlic, mustard, honey, salt, pepper and vinegar into the blender.  Pulse until completely pureed.  Taste and adjust seasonings accordingly.  With blender running, drizzle olive oil through top opening until all is combined.  The mixture may break and curdle if all the olive oil is added at once.  Store any unused portion in a lidded container (not metal) in the fridge for up to a week.


(c)copyright Jill Anderson
The Homegrown Gourmet


Tuesday, March 16, 2010

Recipe for Ground Bison Bolgnese

http://italian-sauces.suite101.com/article.cfm/easy-ground-bison-bolognese


shown served with Gluten-Free Quinoa Pasta Elbows


(c) copyright Jill Anderson
The Homegrown Gourmet

Whose got your Gluten-Free, Vegan Back Baby?

I knew it was a crazy idea because everyone knows you can't make crepes without eggs right?  Then I started thinking about all that gluten and stomach ache I was going to have even if I figured out a way to make them without chicken embryo gut bombs.  My thinking was, "they are going to be these carboard tasting, goey textured pancakes".  Which, let me add at this juncture...they WILL BE exactly that if you don't chill the dough AND if you fail to cook them long enough.

Typically crepes are made over moderately high heat (not screaming though) and they only cook a couple of minutes per side.  It doesn't matter whether you use a crepe maker or a saute pan (like I do...I don't need another electric gizmo to take up space in my kitchen), the traditional crepe cooks pretty darn fast.  But if you take note of the texture of the batter...especially right after it hits the hot skillet and you swirl it all out nice and thin, you'll notice that it LOOKS rubbery.  Now, if you know how to make them, they don't taste or feel rubbery but you can see the elasticity when they cook.  This of course if from the protein bonds in eggs and the flour. 

Gluten-free Vegan crepes will not have that.  They'll have a little bit of a protein bond from the interaction of the flour and the almond milk...but certainly not enough.  That's why I add a little xantham gum to my batter.  I tried it both ways...with and without.  The ones made without just fell apart.   The ones made with...looked and cooked up much like a traditional crepe with the exception of the cooking time.  Also, the batter doesn't "run" quite as easily when you swirl the pan.  You may need to give it a little help by filling in the gaps with a few drips of batter here and there.  As for cooking time...no less than 5-7 minutes per side, depending on how hot your pan is.  If you get it too hot, the crepes will burn on the outside before they are cooked through so take it easy on the heat.  I kept mine set at a steady medium...dead center of the button on my stove eye.  Match your skillet size to your burner size for even heat distribution and thus even cooking also. 

I know all this sounds like one gigantic pain in the butt...BUT...if you're already a gf and or vegan cook, you are well aware that experimenting is part of the process.  Some of them work...some don't.  This one works great.  As to the taste...they actually taste amazinly close to a regular crepe which totally blows my mind because the CEGB's make up most of the flavor component of regular crepes.  Or is it just a fried bread thing?? 

You can make these sweet or savory.  Reduce the amount of maple syrup in the batter for a savory crepe though.  In this recipe, I made them for dinner filled with mushrooms and shallots sauteed in white wine.  I hope you'll give them a try. 


Gluten-Free Vegan Crepes


•1 cup all purpose gluten free flour blend
•1 teaspoon xantham gum
•2 cups unsweetened almond or rice milk
•1/2 cup water
•1/2 teaspoon kosher salt
•1/4 cup melted coconut oil
•2 tablespoons pure maple syrup - reduce to 2 teaspoons if making savory crepes


•Combine flour, xantham gum and kosher salt in medium bowl. Add remaining ingredients and mix until no lumps remain. This process can also be done in the blender.

•Cover batter and chill for at least 2 hours. Note: Chilling is important and crepes may not turn out as well if batter is not chilled.

•To Fry: Heat an 8" non stick skillet over medium heat and brush with a small amount of coocnut oil. Test by dropping a few drops of batter into skillet. Batter should blister up right away.

•Mix batter well before adding to pan. It should be about the consistency of unbeaten heavy cream. Ladle into pan and immediately tilt pan to spread batter. Fill in any holes with a few drops of batter.

•Fry until browned and set before attempting to flip. Crepe will need to cook twice as long as a traditional crepe or inside will be doughy. About 6-7 minutes per side over medium heat.

•Transfer to a plate and continue making crepes until all batter has been used. Use filling of choice.


For a delicious and simple savory filling; saute four thinly sliced shallots in two tablespoons of olive oil. Stir in 1 1/2 pounds of sliced mixed mushrooms. Saute until mushrooms are tender. Deglaze pan with 1/4 cup white wine and season with salt and pepper to taste.


Make a slurry of 1 teaspoon arrowroot powder and 3 tablespoons of water or vegetable broth. Pour into mushroom mixture and stir until thickened. Use this mixture to fill crepes.


Make a simple sauce using 1 cup vegetable broth and 1/2 cup unsweetened almond milk thickened with 1 tablespoon arrowroot. Bring this mixture to a boil; season with salt, pepper and herbs of choice. Serve over mushroom crepes. These are particularly good with a sprinkle of minced fresh Tarragon.

I placed my pan of finished crepes under the broiler with just a little of the sauce over them to crisp up the tops.  It made them look and taste yummy!


About to take a nice big yummy bite!


(c)copyright Jill Anderson
The Homegrown Gourmet


About Me

My photo
Fort Myers, Florida, United States