Monday, July 12, 2010

Confused Pizza

I supposed I could have just as easily called this post "befuddled taco" but since it LOOKS more like a pizza...pizza it shall be!  In an effort to please the collective palates of 10, 15 and 46 year old males, I was keenly aware that the only ingredient of consequence was cheese!

I often joke that my husband would eat ANYTHING be it covered with enough cheese or saturated in sugar.  His somewhat lame and sterotypical response..."I was born in Wisconsin."  That doesn't really hold water when you consider that the boys were NOT and their dairy (and sugar consumption) borders on the obscene. 

However, lacking the urge to field complaints and questions about "strange looking vegetables" I simply fell back upon a tried and true man-food:  pizza.
A quick perusal of the fridge yielded a 3 lb bulk bag of "Mexican blend" shredded cheese from my last trip to BJ's, sour cream, guacamole and a sack of romaine hearts.  The kernels of an idea began to form....

Sure enough, the freezer supplied me with a package of grass-fed ground beef from the co-op, a baggie of left over jalapeno pieces, container of frozen fresh lime juice (from the last time I got key limes 20 for a buck at the farm stand), and a cube of frozen cilantro. 

I searched the pantry for a jar of commercially prepared salsa...in vain.  I do not normally buy it (even the better quality organic refrigerated kind) due to the high sodium content, but it was worth a shot!  Lacking that, I settled upon a can of no-salt added diced tomatoes with which to make my own.

From here it isn't much of a stretch to figure out where this is going....Tex-Mex ingredients...jar of sourdough starter in fridge...

It worked out exceptionallly well and was indeed quite a hit with all three of the boys. 

Here is my Pizza that wants to be a taco...or my taco that thinks it's a pizza...


*If you don't have a sourdough starter, simply prepare a yeast dough

To begin:

  1. Bring 1 cup of sourdough starter to room temperature in a large glass or plastic bowl.  In a small bowl, combine 1 cup 110 (mzx temp) degree water with 1 envelope ( 2 1/4 tsp.) dry granulated yeast and 2 teaspoons sugar.  Stir and allow the yeast to sit undisturbed for 10 minutes to bloom.  This mixture should be foamy.  *Always mind the date on the packets of yeast lest you ruin your dough!
  2. Once the yeast has begun to feed on the sugar and produce bubbles, pour this mixture into the sourdough starter.  Stir in 1 cup of unbleached all purpose flour, 1/2 cup fine yellow corn meal, 2 teaspoons kosher salt and 3 tablespoons olive oil.  Mix vigorously; cover and let rest at least 20 minutes to form the "sponge".  Properly mixed and rested in a warm, draft free encvironment; the mixture will produce large bubbles in the dough.
  3. Once rested, begin by adding an additonal cup of flour.  Work in with a spoon until it is no longer possible to do so.  Add enough flour (generally takes the first additon and 1 more cup) to form a soft dough.  It should be sticky but relatively easy to handle.  Turn out onto lightly floured surface and knead 5 minutes.  Excessive kneading is unecessary for pizza crust.
  4. Place dough in an oiled large glass bowl.  Turn the dough to coat all sides with the oil.  Cover with a damp towel and rest in a draft-free place for approximtely one hour or until doubled in bulk.  Punch down, divide into 2 equal portions.  Sprinkle pizza sheets liberally with yellow corn meal (not oil).  Roll, stretch or press dough to fill pans.  Rest 20 minutes whilst toppings are prepared.
To make this crust without the use of a starter simply follow all directions except you will begin your dough with TWO cups of warm water and may want to add 1/4 cup dry milk powder for fortification and to give the yeast more sugar to feed upon.

If you are using commercially prepared salsa, simply spread evenly over rested crusts with a spatula.  If making your own simple salsa:

  1. Finely mince ( or blitz in food processor) 1 small mild yellow onion, 2 cloves garlic, 1/2 seeded jalapeno (or to taste) and 2 tablespoons cilantro.
  2. Add the above to 1 28 ounce can of drained petit diced no salt added tomatoes or if you prefer a thicker "sauce" type salsa, use a 28 ounce can of crushed San Marzano tomatoes.  Season with lime juice and salt to taste.  Adjust heat with more jalapeno or some cayenne.
  3. Spread evenly over pizza crusts.  You will probably have extra salsa which may be stored in the fridge to eat with corn chips.
For toppings:  Use what you have or what you like.

I topped mine with copius handfuls of the tiny-shred Mexican blend of cheeses, mild banana pepper rings and ground beef which I sauteed off, drained of excess fat and seasoned with cumin, chili powder, garlic powder, diced onions, salt and pepper.

I distributed the beef evenly between the two pizzas, layered on some pepper rings and topped the whole of it with the cheese.  Bake in a preheated 375 degree oven until crusts are golden brown and move around easily when the pan is gently shaken.  Tip:  the corn meal on the sheet keeps them from sticking, adds a great crispy texture AND...contributes no additonal fat (because pizza does not need any help in the fat department).

Baking time will vary from oven to oven.  Since both of my round pans will not fit on the same rack, I rotated them halfway through baking to ensure that each got the same degree of doneness.  In general, it should take around 30 minutes.

I put together a quick topping of diced yellow tomatoes, 1 rinsed and drained 15 ounce can of black beans, 1 small diced yellow onion with a bit of lime juice and salt.  Top the baked pizzas with shredded lettuce, the tomatoe mixture, more cheese shreds and generous dollops of sour cream and gucamole.  You have extra salsa if you want to use that too!


As you can see...this isn't the first pizza my pans have ever seen.  They have been though the wars!  That is when they bake the best.


(c)copyright Jill Anderson
The Homegrown Gourmet

Sunday, July 11, 2010

OCD Cleaning Day...

Sometimes I have to be honest with myself and fess up to being OCD about cleaning.  From the contents of my blog it would be no stretch to assume that my OCD extends to cooking as well...which it does!  In between all the cooking, writing and posting however, I scrub. 

I raised girls and make no mistake...they were SLOBS! My oldest daughter's room was a petrie dish with walls and a ceiling and yet today at 27, she follows in her mother's sterile footsteps.  My middle daughter (the chef) was a clean freak extrodinaire and now, working 70 hour work weeks; she could care less about cleaning her apartment!  The youngest...well, she burns her chakra candles, listens to her new age music and takes it all in haphazzard, hippie stride.

I suppose I've gotten cratchety in my dotage or maybe I'm just not used to BOYS!  I thoroughly enjoy having my young step-sons visit us.  They are sweet, respectful children who behave well.  They are just BOYS and as such they leave crumbs, stickiness, dirty underwear, smelly socks and general bedlam in their wake! 

Yesterday, I didn't bake or cook a single thing!  I cleaned like a Hoover running on nuclear energy all day yesterday.  By 4:00 pm, I had my house in impeccable order, fragrant essential oil candles and burners infusing the air with pleasing aromas, my favorite CD of feng shui music and nature sounds playing softly, esoteric girgling from the zen fountain in the hall and every nook and cranny clean, clean, clean. 

Ahhh...I snipped several handfuls of mint from a pot on my lanai and steeped it in hot water with a sachet of organic green tea.  I chilled it down, poured it over ice cubes and had the most amazing libation!  Surveying my handiwork and basking in the quiet, perfect spa-like atmosphere that I crave is my definition of nirvana.

I suppose I need not say that this bubble of peaceful meditative solitude never lasts very long.  Neither does the absolute cleanliness and order.  My husband (after 6 years together) has only JUST learned to remove his shoes in the garage and cease his strange habit of bringing greasy motor parts or gunky calk guns into the house.  The first time I ever visited his house when we were dating; I had to step around an engine block to get in the front door and there was a carburator on the dining room table.  To his utter astonishment, he has discovered that he actually LIKES not living in squallor!  He was also incredulous to learn that bed sheets should be changed more than twice a year.

So, round two begins!  He arrived last night around 7 from picking up his youngest son and his half brother.  Sigh...I'm looking at a couple of crumbs right now which are gloating at me from their resting place under the kitchen table.  Somehow, I missed them the last time I swept...15 minutes ago.  Else they got there SINCE I swept at the last 15 minute feeding interval....

The house is divided into two distinct sections.  There is MY side of the house and the usable side.  The kitchen is in the usable side BUT...it is unquestionably my exclusive territory and I protect it fiercely.  My own girls had the most unflattering nickname for me when they were teenagers.  I was known amongst their friends as The Kitchen Nazi.  The Crumb Gestapo...
I can't say it wasn't well earned.  Something in my very soul drives me to carry a bottle of antibacterial cleaner hanging from my belt loop like a loaded weapon.  I drove my poor children crazy.

My side of the house includes the living room and formal dining room...in which children are NOT allowed!  Some adults are not allowed in there either for that matter.  I collect antique dishes and stemware, copper serving pieces and anything else funky or eclectic that strikes my fancy and most of it is housed or displayed in my side of the house.  My fifty year old grandfather clock, an amazing French country "candalier", antique Moroccan birdcages, depression glass, Lladros, Armani's, Hummels, Capodimontes and some truely amazing finds for which I have no history or name.  No children allowed!

antique copper chaffing dish, copper stemless goblets, 24K gold etched shot glasses from the 50's, antique silk table linens, antique Duncan Fife drop leaf dining table.


Victorian Tricycle (the little horse) in the upper right corner


China closet FULL of antique dishes and stemware


This is the "candalier"...a tabletop chadalier that holds candles in little glass cups.  There is also the numbered "Winged Nike of Samothrace" which I got at an estate sale for TWENTY BUCKS that I had appraised for $200 +
Also an amazing decanter and four brandy glasses, etched with a beautiful clipper ship which I got at an antique store in St. Augustine.


Antique Moroccan birdcage from an estate sale...


View from my kitchen into the dining room.  One of my favorite finds is the antique Contrato poster (a numbered edition) beside the fridge.  I found this piece at a FLEA MARKET... in a crappy poster frame with a plastic cover.  They didn't even realize it was an original period poster.  I have it framed under glass with an acid free paper backing.


My kitchen is centrally located between the two "sides" of the house...it's all strange angles and lofty ledges.  I like it because it is unusual.


My "spa" space.....


The canal at sunset...see the marsh bird perched on my neighbors dock?


Centruy plant


pool and lanai

(Sigh)...time to go sweep again!

Saturday, July 10, 2010

A Friendly Recipe

As I mentioned a couple of days ago, the Herman starter for my version of Amish Friendship bread had reached maturation.  It is a test of one's patience indeed to wait ten days to bake something but ten days it must be!  Why?  I don't know because I can tell you with some degree of certainty that the starter has fermented LONG before the ten days are up.

I have also heard a respectable arguement raised that one can actually make Amish Friendship bread without using the fermented starter.  Personally, I feel that it makes a big difference in the flavor of the finished bread.  If not for the starter, you'd basically be making any other quick bread...zucchini, banana, pumpkin etc. 

While it is certainly easy enough to google Amish Friendship bread and be inundated with 101 variations, a common element of 99% of the online recipes use a box of instant vanilla pudding (or some other equally wretched artificially flavored kind).  Does anyone other than myself find it a bit strange that a traditional Amish recipe uses such a modern food of convenience?

Being highly suspect of the authenticy of said food, I asked a friend to ask her Amish friend about this.  The answer I got was...yes, most in fact do use it and the recipe has included the pudding mix since the late 60's.  I'm quite disillusioned!  My bubble has indeed been burst...LOL!

Luckily, I am in possession of a very old Amish cookbook which does NOT use the pudding mix and it is from this that I base my recipe.  As we all know, baking is not generally as forgiving as cooking but this recipe is one of those rare exceptions.  Aside from not baking the bread long enough, I've found that there isn't much I can do to mess it up.  Therein, I believe is the essense of the starter.  Unless you depart WILDLY from the recipe, the bread still rises perfectly.

As before mentioned, zucchini was the add -in of choice this time.  One 7 inch long (approximately 1 1/2 inch circumference) zucchini yields roughly 2 cups of shredds. 

Let's back up and quickly discuss the starter for a moment though.  If you have nothing and are totally beginning from scratch you will warm 1 cup of whole milk to about 105 but not more than 110 degrees  To this warm milk, stir in one envelope (about 2 1/4 tsp) yeast.  Do not use ANY metal utensils, bowls or other implements when making, stirring or storing your starter.  Allow the yeast to "bloom" for 10 minutes before stirring in 1 cup of granulated sugar and 1 cup all purpose flour.  Cover the bowl and place in an out of the way warm place such as the back of the stove or even in the microwave where it will rest for 4 days.  You will stir it once each day.

On the 5th day, add 1 cup warm milk, 1 cup sugar and 1 cup all purpose flour.  Stir well, return the lid and stir once each day until the 10th day.  On the 10th day, feed the starter as usual.  Reserve 1 cup for preparing your bread.  Divide the remaining starter into 1 cup plastic containers.  Keep one to serve as your next starter and give the rest to friends along with a copy of the recipe or freeze them for another day.

Should you have a starter already, remove 1 cup from the fridge and allow it to stand at room temperature for 5 days, stirring once each day.  Feed on the 6th day.  Rest and stir until day 10 when you will feed, divide and store or give away the extra portions and bake your bread.  It goes without saying that you should begin this process in a large bowl else you'll only be transferring later as the starter grows.

One the 10th day...we bake!  One cup of the starter is sufficient for two loaves of friendship bread.

The basic recipe (as I make it) is as follows:

  • 2/3 cup grapeseed oil*  ( I know it is expensive, however I do not buy the whole health hype over canola oil which is NOT a healthy oil despite what you hear...however, if the grapeseed oil is too pricey, canola works just as well).
  • 3 large cage free organic eggs
  • 1/2 cup pure cane sugar
  • 1/2 cup brown sugar
  • 1/2 teaspoon kosher salt
  • 1 teaspoon ground cinnamon
  • 1 cup organic whole wheat pastry flour
  • 1 cup organic unbleached all purpose flour
  • 1 1/2 teaspoons aluminum free baking powder
  • 1 teaspoon baking soda
  1. Place all the ingredients into the bowl with your one cup of starter and stir vigorously by hand until combined.  Do not use a mixer.  Mixture should be mostly lump-free.
  2. Butter and SUGAR (not flour) the insides of two loaf pans.  Divide the mixture evenly between the two pans.  Bake in a preheated 325 degree oven for 45 minutes to an hour.  Prick with toothpick or cake tester to test doneness.
  3. Cool in pans for 10 minutes.  Remove from pans and cool on wire racks.  Warning:  Resistence to warm friendship bread slathered with butter is futile...you will be assimilated! 
Now for the add-ins...

To add anything like chopped nuts, raisins, cranberries, zest, chocolate chips, other or extra spices the basic recipe need not change.  The same is true for fresh blueberries.  Simply toss your add in with a bit of ap flour before stirring into the batter.  The flour coating helps to suspend your goodies in the batter and prevent everything from landing on the bottom of the loaf.

For Zucchini or Carrot Cake bread, the same is true.  However, if the weather is extremely humid you may find that an extra egg gives more lift.  I didn't happen to need one for the loaves I just made. 
  • Zucchini Walnut = basic recipe + 2 c. shredded zucchini + 1 c. chopped walnuts + 1/2 t. extra cinnamon + 1/2 t. ground mace.  *Dont shred zucchini in food processor...makes it to watery.
  • Carrot Nut = basic recipe + 2 c. shredded carrot + 1 c. chopped nuts of choice + 1/2 tsp extra cinnamon + 1/2 tsp ground nutmeg
  • Carrot Cake = basic recipe - 1/3 c. oil + 1 extra egg + 1/2 cup crushed pineapple, drained + 1/2 cup shredded coconut + plus all the rest of the add-ins for Carrot Nut.
  • Banana Nut = basic recipe + 2 ripe bananas, pureed + 1/4 c. extra ap flour + 1 c. nuts of choice + 1 tsp. ground cardamom + extra cinnamon + optional 1 cup chocolate chips
  • Chocolate or Double Chocolate = basic recipe + 1/2 cup sifted cocoa powder + optional chopped nuts + optional orange zest and for double chocolate + 1 cup chocolate chips or chunks.
  • Lemon Blueberry = basic recipe + 2 cups fresh blueberries tossed in 1 T. ap flour + 2 T lemon zest + 1 T. lemon extract
  • Lemon Poppyseed = basic recipe + 2 T lemon zest, 2 T. lemon extract + 2 T. poppyseeds + optional lemon glaze made from powdered sugar and lemon juice.
  • Orange Cranberry = basic recipe + 3 T. orange juice concentrate, 2 T. orange zest and 1 cup dried cranberries
I could go on indefinately...the combinations are only as limited as your imagination.  A strusel topping can also be added to any of the breads...with or without oats.  I've even made them with a struself layer running through the center.  Instead of two loaf pans, you can bake the bread off in a bundt cake pan for one large, impressive looking loaf that is great for company.  Serve as a dessert or with your morning coffee.  Wrap and refrigerate leftover if there are any.  These loaves will dry out if not wrapped well and...they would mold rather quickly at room temperature because they are so moist.

Enjoy!


Poolside breakfast!


(c)copyright Jill Anderson
The Homegrown Gourmet

Thursday, July 8, 2010

Final Entry ....

WHEW!  This one is just a bonus that came about because I found myself in possession of some blooming tea hibiscus blossoms and a bottle of Lychee Sake. 

I have an adopted sister named May who is Burmese and she loves mangos and lychee fruit.  This lovely cocktail was a spinoff of my tea contest endeavors but I thought I'd enter it also since it is so beautiful. 

So, in honor of my sister I have named this entry......

Myanmar Sunset


The great thing about this tea inspired cocktail is that the components can be prepared ahead of time and refrigerated then mixed in a cocktail shaker just before serving.  Alternately, you can make an entire pitcher of the Mango tea mixture at one time.

Prepare the Hibiscus Simple Syrup:


  • 1 cup water

  • 1 cup sugar

  • 3-4 large dried hibiscus blossoms or 7 or 8 small ones

  • 1 bag Rooibos tea (red tea)

  1. Combine all in a small saucepan and bring to a boil.  Remove Rooibos tea bag, reduce heat to a simmer and cook until liquid is reduced by half.  This hibiscus tea syrup may be made ahead and stored in a bottle in the fridge.  Note:  Feel free to double or triple the amount of Hibiscus tea syrup and use to sweeten iced tea.
Prepare the Mango Tea: For the purpose of making measurements simpler, I am giving amounts and directions for a pitcher...or about 4-6 cocktails (depending upon the size of your glasses).


  • 1 large ripe Mango, peeled, pitted and cut into chunks

  • 3 cups water

  • 4 Bigelow organic Green tea bags

  • 2 tablespoons superfine sugar

  1. Bring water to a boil and add tea bags.  Steep until a strong tea is achieved, discard tea bags and add sugar.  Allow tea to cool to room temperature.  Once tea has cooled, place chunks of mango in blender and pour in the cooled tea.  Blend until smooth.  Strain tea (optional) into a cocktail pitcher and chill.
To serve:


  1. To the pitcher of chilled mango tea, add 2 shots of Peach Schnapps and approximately 1/3 of a bottle of Lychee Sake.  Stir to combine.  Alcohol amounts may be adjusted to suit your own tastes.  As described this cocktail is fairly strong...LOL

  2. Use a slice of the mango peel (flesh side) to rub the rims of cocktail glasses.  Place a small amount of matcha green tea powder on a small plate and use it to rim the glasses.

  3. Spoon 2 teaspoons of the Hibiscus tea syrup into the bottom of coctail glasses.  Using the back of a spoon as a deflecter for the stream; fill the cocktail glasses with the mango tea mixture.  If you deflect the stream the bottom layer of syrup will be undisturbed.  It is a beautiful effect.

Notice the lovely green tea powder rim and the glorious Hibiscus tea "sunset" at the bottom of the glass!


I am enchanted by the look of this drink and it tastes heavenly as well!


Here it is in a differnt light.  I was attempting to show the beautiful, sparkling transparency of the syrup but alas...my camera was just not up to the task.  It was also after 5 pm when I took these shots so (sigh), you'll just have to use your imagination!

Tea Contest Entry Number Two

I feel like a robot today.  Cook, photograph, post....repeat.  This is my second offering for the Mission: Food Tea Contest.  I call this one....

Matcha Meringue Sandwiches with Dark Chocolate Mint Ganache

The inspiration for this recipe comes from one of my favorite drinks...Moroccan Mint Tea and my favorite guilty pleasure...dark chocolate.  You just cannot go wrong with this combo.


Often people are afraid of Meringues but they are truely easy; you just need to be patient enough to allow sufficient drying time.  The ingredient list is short, the technique simple and the rewards...RICH!  Oh and nothing could be easier than ganache...by gosh!

You will need:

  • 3 large room temperature egg whites
  • 1 cup superfine granulated sugar
  • 1/4 teaspoon cream of tarter
  • 1 teaspoon vanilla extract
  • 1 1/2 teaspoons Matcha (Green Tea Powder)
  1. Line a baking sheet with parchment paper and preheat oven to 300 degrees. 
  2. In a large bowl, beat egg whites with electric mixer until frothy.  Beat in cream of tarter, vanilla and green tea powder until eggs begin to form soft peaks.
  3. Begin beating in sugar 2 tablespoons at a time.  The process of incorporating the sugar should take around 10 minutes.  Continue beating on highest speed until mixture forms stiff peaks and meringue is shiny.
  4. Fit a piping bag with a large star tip and scrape Matcha Meringue into bag.  Pipe meringues onto baking sheet about 1 inch apart.  This amount makes around 20 meringues.  To make bite sized sandwiches, pipe smaller mounds.
  5. Place baking sheet on center rack in preheated oven and bake 30 minutes.  Reduce heat to 200 degrees and bake until meringues are completely dry.  This takes about 2 hours at that temperature.  You can bake shorter and hotter but you must be careful that you don't allow them to brown.  Meringues will lift easily from parchement when they are done.  Cool completely while you prepare Dark Chocolate mint ganache.
You will need:

  • 1/2 cup heavy whipping cream
  • 1 1/2 cups good quality dark chocolate chips, at least 72 % cacao
  • 1 teaspoon mint extract (or to taste)
  1. In a small saucepan, heat cream until almost boiling.  Place chocolate chips in a medium heat proof bowl.  Pour boiling cream over chocolate; add mint extract and stir until mixture is smooth and all chocolate is melted.  Cover top of ganache with plastic film and refrigerate until cool.
  2. To fill your sandwiches, use a small scoop and place a ball of ganache on the bottom of one meringue.  Sandwich the bottom of a second meringue over chocolate and gently apply pressure to spread out the ganache.  Note: if ganache is too cold it will be difficult to spread without breaking the meringues.  Smooth edges if needed an dust the tops with green tea powder to garnish.
Store in airtight container in fridge.


These are just out of control!


(c)copyright Jill Anderson
The Homegrown Gourmet

I Gottcha Matcha...

As promised, I am posting the first of my contest entries for Mission: Food's tea contest.  I actually ended up getting a bonus recipe out of it so there will be three entries! 

Since I shelled out the big bucks for a tin of high grade Matcha, I decided to put it to good use.  You'll find it all over my three contest recipes (along with another fancy schmancy tea).

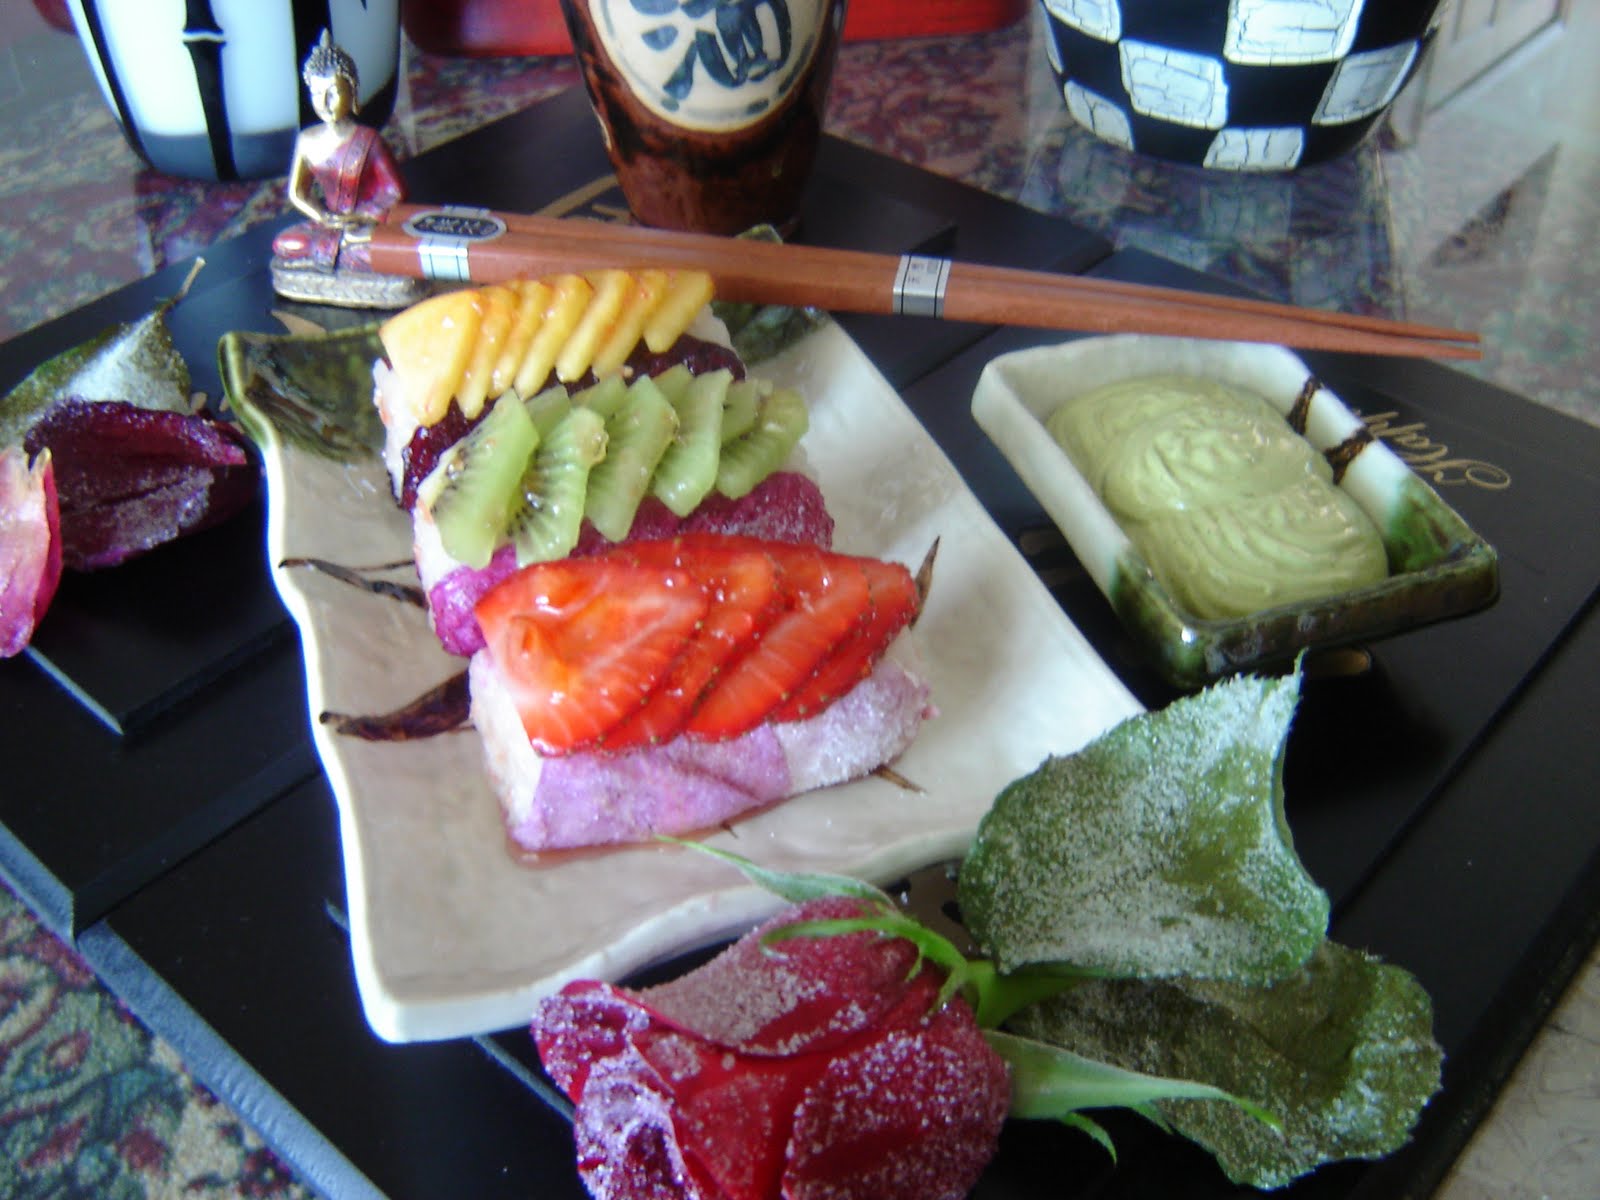
This one I am calling Trio of Dessert Sushi with Matcha Egg Cream


There is literally tea all over this dish.  It first appears in the cooking liquid of the sushi rice and obviously again the Matcha Egg Cream.

Believe it or not...the sushi "wraps" are sugared rose petals.  I realize this may look a little advanced for the average home cook but it is deceptively simple. 

You will need:

  • 1/2 cup sushi rice, rinsed
  • 1/4 cup sugar
  • 1 cup full fat coconut milk
  • 1/2 cup water
  • 1 good quality green tea bag ( I used Bigelow organic Green Tea)
  1. Place ingredients in rice cooker or small sauce pan with lid.  Bring to a boil; reduce heat and simmer until rice is tender and liquid is absorbed.  Remove from heat and cool.  Fluff rice with a fork.  This step may be done a day ahead if desired.
  2. To make the rice cakes, you may use a rectangular sushi mould or form them by hand and square the sides up with a cake batter scraper.  This amount of rice will make approximately a dozen depending on how large you make them.
  3. Cover and set aside while you prepare the rose petal wraps.
You will need:
  • 1 or 2 edible (not sprayed) roses
  • 1/2 cup sugar
  • 1/2 cup water
  1. Place water and sugar in a small sauce pan and bring to a boil; stir to dissolve sugar.  Remove from heat.  Working quickly, dip rose petals one at a time into sugar syrup and wrap gently around the bottom and up the sides of rice cakes.  For added sparkle, sprinkle the outsides of the wet petals with sugar and place on platter to dry while you prepare the Matcha Egg Cream.
You will need:

  • 3 large egg yolks at room temperature
  • 3 tablespoons sugar
  • 1 teaspoon Matcha Green Tea Powder (or more to taste)
  • 3 tablespoons Sake
  • 1/4 cup heavy cream
  1. Create a double boiler by placing a bowl over the brim of a saucepan with a couple inches of water in the bottom.  Take care that the bowl does not touch the water.  Place egg yolks, sugar and matcha in the bowl.  Begin whisking over simmering water.  The mixture will become thick and about triple in volume after about 10 minutes of whisking.  Note:  It is vital to the success of the egg cream that you do not stop whisking.  It can curdle very easily.  You may control the temperature by moving the saucepan on and off the heat source if needed.
  2. Once egg cream is triple in volume and thickened; whisk in Sake 1 tablespoon at a time.  Continue cooking and whisking about 3-5 minutes more until mixture is very thick.  Immediately scrape egg cream out of hot bowl into another small bowl.  Refrigerate to chill.
  3. Beat cold whipping cream until soft peaks form.  Add another 1/2 teaspoon of Matcha and 1 tablespoon of powdered sugar if desired.
  4. Fold the beaten cream into the cold egg cream and chill.
To Plate:

  1. Slice fruits of choice and arrange artfully on top of rice rolls.  Pipe Matcha Egg Cream into a small serving dish.  Place 2 tablespoons Orange Marmalade in ramekin.  Heat in microwave for 30 seconds.  Use this to paint the tops of the fruit.  Garnish with additional sugared rose petals if desired. 


(c)copyright Jill Anderson
The Homegrown Gourmet

Busy, busy, busy....

Fellow foodies...today is shaping up to be an all day food marathon in the Anderson house!  It figures!  This is the first day in 8 or 9 days that it has not rained and here I am, cooking.  Actually, I don't mind as I am yet unable to enjoy the pool due to the crazy glue with which they closed my surgical inscision.  We wouldn't want THAT washing off in the pool!

I'm very enthusiastic about today's endeavours.  For starters (literally), I've been cultivating a Herman starter for my version of Amish Friendship Bread for ten long, long, long days now.  Today is day ten.  I fed it the third ration of milk, flour and sugar this morning and it is bubbling away on the back of my stove under the light from the range hood. 

For those of your who do not know, a Herman starter is a sweet sourdough starter.  I actually started mine with a cup of Lucky (my old friend and faithful companion) to which I added 1 cup of sugar, 1 cup all purpose flour and 1 cup whole milk.  I know, it sounds sick right?  Milk...really??  But trust me, the enzymes in this stuff will kill any fungi jungi and prevent your Herman from turning into bad juju. 

If you don't have any sourdough starter with which to begin, simply mix 1 packet of yeast into 1 cup of 105-110 degree milk and let it stand 10 minutes till it foams and the yeast blooms.  Add 1 cup of sugar and 1 cup of milk and begin your arduous 10 day count down.  Do not refrigerate the starter.  Feed it the same formula on the 3, 6th and 10th days.  If you already have a live starter as I did, you only need feed on the 5th and 10th day.  On the 10th day...you bake using 1/4 of the starter which is about a cup.  Keep one portion for your starter and either give the remaining two to friends or freeze them.  You'll need to treat each portion as a new starter and feed on the 5th and 10th day regimen.  I won't go into the specifics of the bread recipe at this time because I'll be posting it later.

So at some point today, my house will be filled with the sweet aroma of baking friendship bread.  I have some zucchini that need using so I have decided that mine will be zucchini spice.  I don't follow the Amish friendship Bread recipe to a tee but mine is obviously an adaptation.  The loaves freeze well also.

In addition to this, I am putting the finishing touches on two contest entries for the tea contest sponsored by Mission:Food  I adore food contests.  It gives me a chance to be creative and since I'm a Sagittarius, it also satisfies my constant need for competition!  I'm giving away NOTHING as to the nature of my recipes though (in case they are a flop).  Various elements for each are either chilling or drying as of this post and I expect to assemble and photograph each after lunch.  I must say, I'm fairly exuberant with anticipation for the outcome!

For Stella at http://thewitchykitchen.blogspot.com/  I made a batch of my Vegan Chickenless Chicken Salad for lunch today so I could photograph it and post the recipe.  I'm noshing on that in whole grain pita pockets with some crisp raw veg on the side.  I have prepared mine with homemade soy-free coconut oil based vegan mayo but you may use a commercially prepared product like Nasoya or Vegannaise if you wish. 

The recipe itself is simple but it takes a little time (and fiddling) to prepare the barley which will become the "chicken". 

You will need:

  • 1 1/2 cups dry bulk pearled barley
  • 3 cups low sodium vegetable stock
  • 1 tablespoon dry poultry seasoning
  • 1 medium yellow onion, peeled and halved
  • 2 cloves peeled garlic
  • 2 large carrots, halved (peeling isn't necessary)
  • 2 stalks celery, halved
  • optional: bouquet garni of fresh thyme, sage and parsley
*the fresh herbs are optional since you are already using dried poultry seasoning  but I encourage you to use them since nothing adds the fresh herby taste better than fresh herbs!

  1. For this stage (which may be done a day ahead) you will bring the broth to a simmer in a 2 quart saucepan with lid.  Add all the ingredients in the above list along with black pepper and kosher salt to taste.  Cover tightly and cook until barley is tender and liquid has been absorbed.  This may be done on the stove top or in the oven. 
  2. Remove the vegetables and discard  Fluff the barley with a fork and cool completely before proceeding to make the salad.  This works well done the day ahead.
  3. The cooked barley must be ground using either a food processor or an old fashioned meat grinder that attatches to the counter top.  The latter actually provides the best textural results but since most don't have this gadget; a series of pulsing and scraping the sides of the processor will suffice.  You do NOT want a barley paste!  Pieces are fine.  Their chewy texture is what gives the salad the mouthfeel of minced chicken.
  4. Place the ground barley in a large bowl and add the following:
  • 1 cup or more for extra creamy Vegannaise or see my recipe for homemade soy-free coconut oil mayo.
  • 1 cup finely diced celery
  • 1/2 cup finely diced bermuda onion
  • 1/4 cup finely diced red bell pepper
  • 1 cup chopped broccoli slaw
  • 3 tablespoons minced Italian parsley
  • 1 tablespoon finely minced dill
  • 3 tablespoons dill pickle (or sweet if you prefer) relish
  • salt and pepper to taste
  1. Mix all ingredients thoroughly and chill until ready to serve.  This salad works equally well as a sandwich filling or served in hollowed out tomatoes or lettuce wraps.

the broccoli slaw, when coated with the mayo even looks like shreds of chicken and the barley is indistinguishable.


Well, lunch break is over and its back to the kitchen.  Look for some exciting posts by this evening!


(c) copyright Jill Anderson
The Homegrown Gourmet


About Me

My photo
Fort Myers, Florida, United States